Is 28 Gauge Sheet Metal Easy to Bend for Body Work

By Matt Joseph
Excerpted with permission from "Collector Car Restoration Bible."
Sheet metal work falls into two realms: manual arts and technical skills. The strategies for and operations of removing complex deformations (a.k.a. "dents") from sheet metal body parts are so variable as to make choosing between them an art in itself.
There is usually no single correct approach to such a complex task, and various approaches may produce virtually equal results. Of course, there are also numerous substandard or incorrect approaches to this work that can hide original damage while actually producing further, hidden damage.
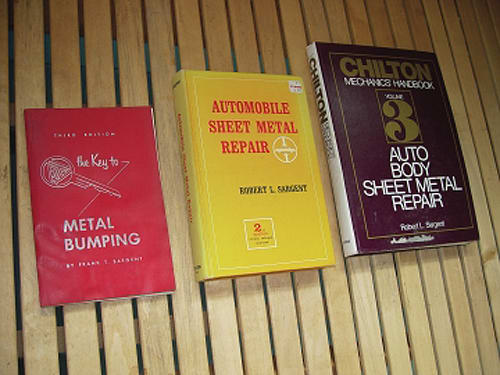
The three books shown here are the most basic and important texts for the metal man. The one on the left evolved from a tool catalog and was the first systematic guide to auto body sheet metal work. The two on the right are really the same book in different issues. They offer a comprehensive understanding of auto body sheet metal work.
Because elements of judgment, efficiency, experience and even inspiration are possible in sheet metal work, it borders on being an art. However, other aspects of sheet metal work, such as hammering, welding and knowing the effects of heat on this material, are highly technical and require a clear understanding of cause and effect before you can understand and perform them successfully. These are really technical areas that can be demonstrated scientifically. The result of all of this is that good sheet metal work requires a study of basic technical factors, experience in the actual work and imagination and ingenuity in approaching some of the more difficult problems posed by sheet metal repair.
There are several textbooks that deal with automotive sheet metal and refinish work in particular, and that devote one or more chapters to sheet metal repair in general. Some of these books are fairly useful for beginners, but many of them are designed for use in conjunction with classroom instruction. The latter really don't work very well without it.
While it is possible to approach some mechanical repair operations with "the book open" on a fender, this will never do for body restoration and refinishing. As well, classroom guides will tend to tell you just enough to make you dangerous, and will often overlook much that is basic. That's the best of them. The worst of them tend to describe procedures, operations and materials in ways that are completely and perfectly understandable, as long as you understood these things before you read the descriptions of how to do them.
There are two books that I think really do provide useful insights into how to deal with various aspects of steel sheet metal repair. Unfortunately, one of them is too cursory for most people and the other is too detailed. However, if you are new to this work, you should have a look at both of them.
The Key to Metal Bumping by Frank T. Sargent was first issued in the late 1930s and was basically a user's guide to the body tools made by the Fairmont Forge Company. Various revisions and editions followed the original issue, and by the third edition (1953) this book had become a pretty good treatise on the "Fairmont Method" of dealing with sheet metal repair. The third edition also included all sorts of helpful hints regarding welding and other skills. The basic premise of the book is that you must employ a specific method to straightening sheet metal. You cannot just go in with a hammer and start banging 'out' things that seem to be 'in', or vice versa.
The method proposed in The Key… involves distinguishing between permanently deformed metal and metal held out of place by permanently deformed metal. The prescription for repair is to analyze the order in which damage occurred during the impact that caused it, and to remove it in the reverse order. The Key… is a short book and leaves a lot unsaid, but it is a good basic guide to the field of dinging out and metal finishing sheet metal.
At the times of its issue and revisions, The Key… was almost revolutionary in proposing a method of analysis and plan of attack to confront sheet metal repair work. I would suggest that the proposed plan is useful, but not the only way to approach these problems. In any case, The Key… is a good place to start the study of sheet metal work. It is also readily available from a number of old car hobby booksellers and from suppliers of autobody tools and supplies.
Automobile Sheet Metal Repair, by Robert L. Sargent (Chilton), and its newest revision, Chilton's Mechanics Handbook, Volume 3: Autobody Sheet Metal Repair is the most comprehensive general book that I know of on this subject. Whereas The Key… makes this work sound wonderfully easy and simple, Sargent confounds the reader with the full complexity of every aspect of the analysis and remedial operations involved. This sure isn't bedtime reading if you want to sleep at night, but if you take the time to read it and understand it, you will gain a good grasp on the theory and the practice of this work. I recommend it highly for those dedicated to learning how to perform this craft.
One thing that you will get from reading these books, or the rest of this chapter, is the concept that sheet metal repair involves more than just beating or pushing out a dent. Beyond that, there are approaches that will efficiently yield a repair that looks good, is permanent, uses no or very little filler and restores the basic integrity of a damaged panel. That, of course, is the object. However, no matter how many articles, books, pamphlets, videotapes, CDs, DVDs and seminars you absorb on this topic, experience is still essential to perfecting your sheet metal technique.
NEVER attempt to do work like this solely based on book knowledge. The best approach is to find some old body panels: doors, fenders, hoods, etc., and damage and repair them yourself to get the feel of the thing. Armed with a basic knowledge of the craft, you will learn more in five or six hours of experimentation with real sheet metal parts than you would have thought possible. I stress this point because I have seen body panels and whole cars ruined by people who thought that body work was as simple as skilled practitioners or glossy tool sales pamphlets make it look. It isn't. Scrap panels are cheap, but the repair of the damage you can do to a treasured car will be expensive.
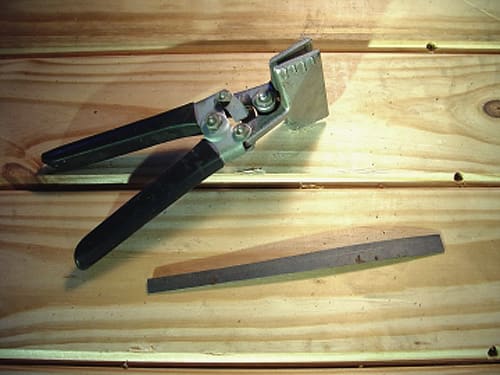
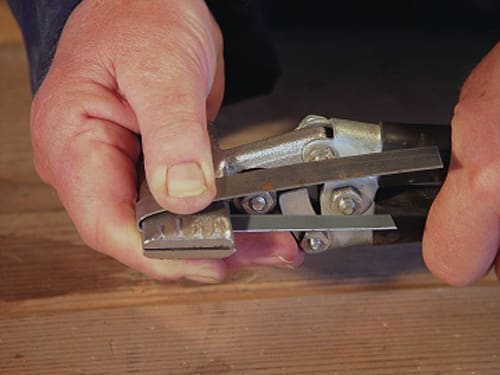
The following sequence of photographs describes a basic work hardening experiment in sheet metal. It illustrates how work hardening occurs, and what its effects are. The factor of work hardening is critical to auto bodywork and restoration because it limits how far you can move metal without annealing it. The experiment involves a strip of 22-gauge sheet metal. It will be deformed and straightened with a pair of sheet metal pliers, and then with a low-crown body hammer on an anvil.
In addition to practicing your technique on scrap panels during your early learning, you can often try new or alternative strategies out on them. Sometimes, it's easy to duplicate in scrap approximately the actual damage in something that you are working on. Then, you can experiment to determine what the most effective repair strategy will be. Scrap panels also provide a wonderful inventory of formed metal sections for repair purposes. It's amazing how often you can find an area or part of a scrap panel that can be modified for a specific place or purpose that you have. This can save hours of work with rawhide mallets and shot bags.
There are many neat tricks in bodywork that can save time and promote quality, but there are also some very bad "dirty tricks." In each case, it is important to know why something is supposed to work rather than just taking someone's word for it. Over the years, manufacturers have come up with many tools and materials that don't work at all, or that work only to a limited extent or in limited situations. Take, for example, panel flanging tools. There are very few applications where these tools can be used appropriately and to advantage. Mostly, they are used to save time and to reduce the skill levels that otherwise would have been required to fit panels properly for butt-welding. When used improperly, these tools stop being neat tricks and become devices of destruction. In these cases, either experience or common sense, or both, should guide you away from such misuses.
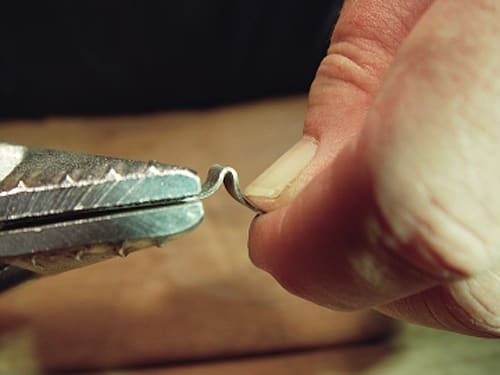
The metal is placed in the pliers and bent by hand as close to the pliers' jaws as possible.
Then, there are the really dirty approaches that should never (as opposed to "almost never") be used. Drilling holes and using body hooks or welding studs to sheet metal to pull it when it could have been pounded out from behind come readily to mind. I realize that you will see so-called "professionals" doing this stuff and, in fact, I see several examples of these and other barbaric "techniques" on display at automotive trade shows every year. They may work well enough to meet the needs of low-end commercial work. That doesn't make them right for restoration work. Intuition and common sense should tell you which approaches are damaging and which are in the interests of the preservation of old automobiles.
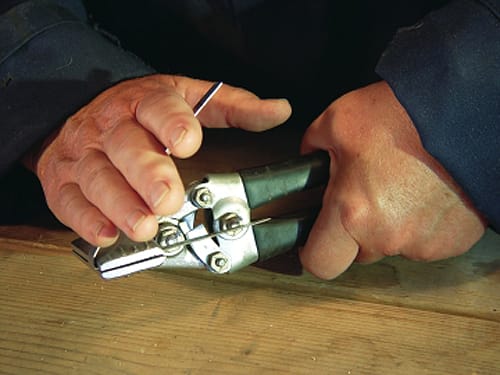
The hard bend continues.
One of the nice things about sheet metal work is that simple tools and simple approaches are often best suited to the needs of repair and restoration. Seemingly complex problems can often be subdivided into a series of simpler problems and tasks, and solved simply. While fancy clamping, pulling, pushing, and bumping tools are available, a few good hammers and dollies, along with the skill to use them properly, will almost always provide the best basis for restoration repair work on sheet metal.
This is not to argue against some of the sophisticated equipment and techniques out there, but just to state that knowledge and experience are always the starting points in this work, and that much of what passes for sophistication in the modern repair sector has very little application to old car restoration.
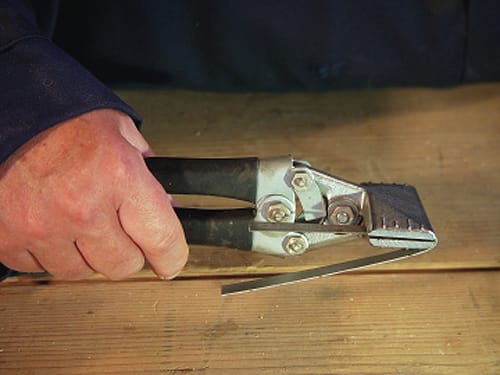
The bending continues until the sheet metal is bent back around the pliers' jaw as tightly as is possible by hand.
Sheet Metal: Composition, Fabrication and Basic Characteristics
The sheet metal used for automobile panel fabrication, and for some panel support structures, is a highly evolved and complex series of alloys based in the steel family. Sheet steel uses several alloying components to achieve desirable characteristics. The most important of these is carbon, which is added to steel in concentrations of between 1/4 and 3/4 of 1 percent, (usually near 1/4 percent for automotive sheet metal). Because many operations are involved in converting a basic slab of raw steel into what we call "sheet metal," the choice of characteristics that alloying is designed to accomplish must begin with these transformations in mind. Beyond that, automotive sheet metal has to be die-formed into complex shapes, trimmed and sometimes flanged. In many cases, it also has to be weldable for attachment purposes. These needs dictate the specific constitution of the steel used in automobiles.
Numerous technical terms define the physical characteristics of steels. These include elasticity, hardness, ductility, plasticity, yield strength, toughness and so forth. Each of these terms, and several others, has a specific meaning when used to describe steel.
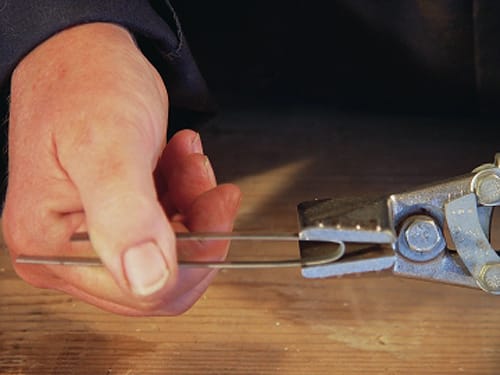
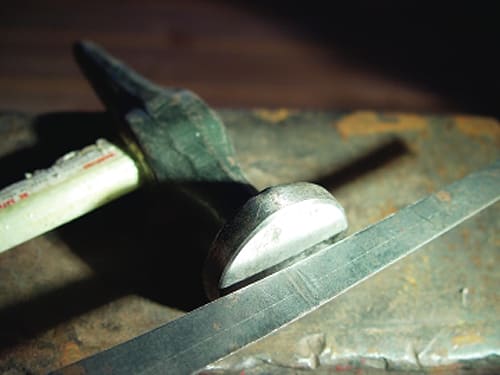
Now the metal is gripped between the pliers' jaws and compressed slightly.
The descriptive terms that are of most interest to us are plasticity and elasticity. The first, plasticity, describes the ability of steel to be formed by pressure (dies) without tearing, cracking or otherwise failing. The second term, elasticity, involves the ability of steel to deform and subsequently spring back to its original shape without any change in that shape. In both cases, the key phenomenon is the presence or absence of something called "work hardening." This phenomenon is of crucial interest to those who work with sheet metal. It involves the fact that as sheet steel is deformed (by die stamping, accidental impact or a repairman's hammer), its crystalline structure changes with the effect that it becomes harder and thus more resistant to further change. The classic example of this is a demonstration with a paper clip, which begins life as a piece of straight wire and is then bent into its customary shape.
Yet, if you attempt to straighten one of the bends in a paper clip by grasping its straight sections 1/2 inch back from a bend and applying force in the reverse direction from which it was applied to make the bend, the wire will not straighten completely. Instead, the metal on either side of the original bend will ultimately deform before the bend is completely removed. Photos that accompany this chapter make this point with regard to a 1/2-inch-wide strip of 22-gauge body steel.

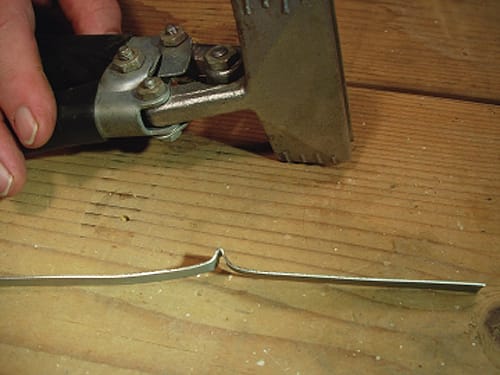
The metal strip is now gripped in the pliers as close to the bend as possible, and an attempt is made to bend it back straight by hand.
What has happened in this example is that the original bend that I put in the strip of mild steel has work hardened it to the point that, when I apply counter-pressure to it to remove the bend, I create two more deformations on either side of the original one. It is easier for the metal adjacent to the original bend to yield than it is for the metal in the original bend to yield, because that metal has been work hardened by its original deformation.
The phenomenon of work hardening is critical in the design and fabrication of sheet metal automobile panels. It is both a problem for, and an asset to, anyone who has to repair sheet metal. The asset is that the areas where dies have deformed sheet metal from its original flat state provide much of the necessary panel strength in body design. The problem is that when a panel must be straightened due to impact damage, it will have hardened in several places and in ways that may make it difficult to straighten it without inducing additional deformations.
It was hardened in the original stamping process of its manufacture. It has been further hardened by road vibration, which is particularly prevalent in configurations like pontoon fenders. Finally, impact damage has further hardened it. Now it may be difficult or impossible to get the panel bumped back into shape without dealing with the work hardening of the metal that is holding it in its deformed shape.
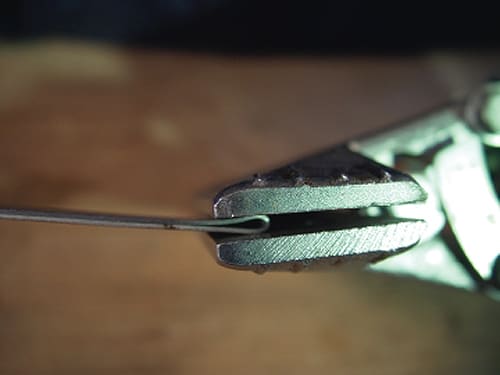
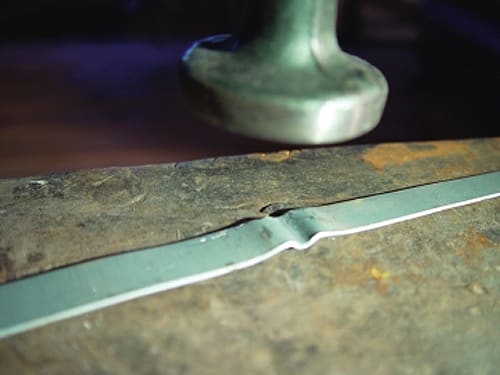
The area of the first bend refused to bend back straight, and the metal on either side of it has yielded to the reverse bending pressure first. This is because the metal in the original bend was work hardened and provided more resistance to bending than the unbent metal on either side of it. Without some further intervention, this is as straight as the author's wife can get the steel strip with her hands and a pair of sheet metal pliers. This is a visibly dramatic demonstration of the work hardening phenomenon. It also is very similar to what happens when you attempt to hammer a crease out of a fender by hammering directly on the crease.
Sometimes you can work around work hardening by adopting a repair strategy that forces things back into place in spite of it. In the case of the infamous paper clip, it is possible to bend it almost back into a straight wire if the work-hardened legs of the bend are supported close enough to the center of the bend during the reforming operation. It is also possible to hammer it flat on a vise or anvil. In other cases, the effects of work hardening are so severe that the metal involved will readily fracture before it can be hammered or forced back into its original shape.
In these cases, heating the affected area to its "transformation temperature" is usually the best solution. This process is called "annealing." Auto body sheet metal will lose the effects of work hardening if it is heated to temperatures of about 1,600 degrees F. and air cooled. The application of such heat allows the crystalline structure of the metal to rearrange itself in ways that undo work hardening effects. The problem is that this solution may produce a panel, or areas of a panel, that have little of the hardness that was stamped into them originally. Since the original stamping was probably designed to induce work hardening into the panel's critical areas as an element of its structural strength, annealing can create structural weaknesses. Heating followed by water quenching (rapid cooling) is the most common solution to selectively re-hardening metal in ways that maintain some of the original hardness of the die-stamped panel.
The die-stamping process is a wonderful thing to behold in an automobile stamping plant. When you see it, you can appreciate the enormous forces at work when automobile panels are manufactured. In the stamping operation, huge dies (108 inches long dies are pretty standard for large panels) that weigh many tons are forced together under enormous pressure with sheet metal between them. The dies are often lubricated if they are the "deep draw" variety. The first action of their closing is for "binder rings" to clamp the metal at its edges before the dies deform it. If this were not done, metal would be pulled into the die and would wrinkle under the pressure of the closing die faces. More recent stamping technology employs even more massive and complex tri-axle transfer presses that literally roll shapes into metal.
Following the stamping process, trimming operations and (sometimes) flanging operations occur. In almost every case, the areas of high deformation, such as creases that run the length of a panel, are put there to give the metal strength by purposely work hardening areas that will bear stress or load in service.
The sculpted and ridged sides of automobiles are usually as much accommodations to the needs of structural design as to the whimsies of styling. Of course, some areas of great deformation are there for the necessities of function, as, for example, the formed ends of panels on a car that wrap around so that the car can end!
The die stamping operation produces three types of panel area, and infinite combinations of these three. The three basic types are: high crown, low crown and reverse crown. It is critical to distinguish between them when you repair damaged automobile panels.
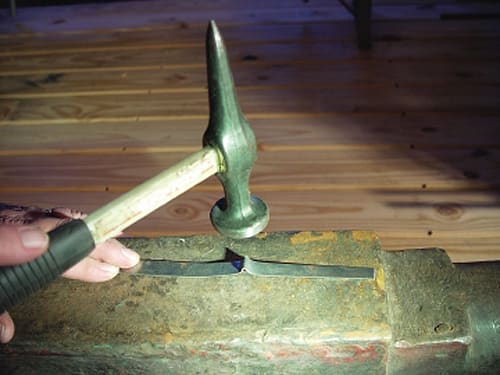
To really straighten this strip, and to overcome the work hardening in its bend, would take mechanical force, as is shown here. This will tend to stretch the metal, unless it is done very gently. Keep these characteristics of sheet metal in mind when you go to straighten out a ridge, V-channel or buckle in a mild steel panel.
High crown panels are those with a great deal of curvature in all directions. They have a rounded appearance and fall away from a point both north and south, east and west. These are, of course, panels that have been substantially deformed in the die stamping process. They usually are much easier to work with than low crown panels because they have fewer tendencies to buckle under heat or when they are hammered after they have been deformed or mildly stretched by impact or by previous repair. When high crown panels are properly finished, they tend to reflect light in a way that is forgiving, even if their exact original curvatures are not retained in repair.
In contrast, low crown panels are quite flat and have very little curvature north, south, east and west. They may have curvature in one direction, like the top of a door or fender, where the format is usually a simple bend in one direction. The slab-sided doors on Lincoln Continentals in the early 1960s are another example of low crown panels. Low crown panels have little of the internal strength of high crown panels because they underwent very little deformation and work hardening in their die-stamping process. Strength is often added to low crown panels by adding supports, or sometimes by forming them in the pre-stressed (monocoque) construction that is occasionally borrowed from aircraft design for advanced automobile design.
Low crown panels can be very hard to work with because, if they are large, any stretching will make them buckle when they are returned to their correct shapes, unless the stretched extra lateral dimensions of the panels can be chased to their edges or hidden in high crown areas somewhere else. Otherwise, they have to be shrunk accurately when they have been stretched. This can be a very difficult repair procedure.
A particularly common variant of this problem occurs in restoration work when cars with very flat doors have had those doors fill with water and rust out for several inches along their bottoms. Any welding process that is used to section-in new metal will produce some degree of heat distortion in the door skin. This must be painstakingly eliminated.
In four-door cars, the back doors usually must have contours that match the front doors, thus continuing the body lines. The door pairs on each side of the car will have to reflect light in a way that indicates that the panel match is uniform and continuous. If this cannot be done, I would suggest that the car always be parked in the middle of a large field or unlined parking lot, and away from anything distinctive that may reflect light off of its sides and indicate the problem! Good luck.
Reverse crown panels are simply high crown panels in concave configurations. Reverse crown areas are sometimes found between fenders and trunks, among other places. Like high crown panels, they are usually easier to work with than low crown panels, but they often present unique access problems.
Obviously, most old car body panels are combinations of high and low crown areas with an occasional reverse crown thrown in. When a choice is available as to where to weld a patch seam or where small amounts of stretched metal should be relocated, high and reverse crown areas are good bets, as long as they are not weakened by annealing or by changes in curvature in the process.
A final characteristic of auto body sheet metal that should be considered is its basic gauge or thickness. There are half a dozen gauge wire and sheet steel gauge standards running around out there, but automotive material is generally described by the "Manufacturers Standard Gauge for Sheet Steel" standard. In this system, the gauge number is the number of pieces of steel of a specific thickness that can be fit into an inch. Thus, 2-gauge would be 1/2 inch thick; 4-gauge would 1/4 inch thick, and so forth.
Automotive sheet metal once ran in the range of 18-gauge, which was 48 thousandths of an inch thick (actually 0.0478 inch). 20-gauge became common in more recent times, and this meant 0.0359-inch-thick metal—still a lot to work with in-bumping and metal finishing. However, more recently, 22-gauge (0.0299-inch) has become common, and now 23- and 24-gauge (0.0269- and 0.0239-inch, respectively) have appeared on the scene under the euphemistic name, "high-strength steel." This dreaded (by real metal men) and miserable stuff contributes slightly, I suppose, to lightening automobiles, but carries with it a host of problems. The first is that the alloys used to make it are difficult to form in repair situations because they are relatively hard (high carbon) and have very little elasticity. Check out the decklids on some modern minivans and hatchbacks in any parking lot and note the dents and creases left by people's hands when they have been overly energetic in slamming them shut.
The high-strength steels are also so thin that in areas where salt and moisture are a problem, they exhibit rust perforation alarmingly soon after their manufacture. The elaborate, much ballyhooed and highly advertised anti-corrosion treatments being applied to them are, in fact, necessitated by the thinness of the material from which cars are fabricated. There is some hope, however, because some manufacturers have begun to increase panel thickness slightly on some of their newest cars.
The gauge of the metal with which you are working may determine, in large part, the best repair approach. If, for example, at some future date people decide to restore some of the econoboxes that graced our streets and roads as new cars in recent years, they had better locate a good supply of NOS body panels before they undertake such projects. Many contemporary panels are too thin and too hard to hammer straight when they are seriously deformed. Traditional metal finishing techniques are out of the question because files tend to skate over their high carbon metal or, if they do cut, they weaken the panels grievously or cut right through them. Even disk sanding them can be a hair-raising experience if you are not super careful.
The good news is that the thick, relatively soft metal in most collector car bodies is very susceptible to straightening, welding and metal finishing. When some of the newer technologies, such as MIG (properly GMAW) welding, are applied to them, repair becomes so easy that it is permissible to listen to the radio while you are working.
Basic hammer and dolly work, shrinking operations and welding operations applied to old cars are attainable skills, not the impossible dreams that they sometimes seem to be when you attempt to apply them to most contemporary auto body sheet metal.
Acquired Characteristics in Old and Damaged Sheet Metal
The types of damages that can occur to collector car sheet metal are just about unlimited. The most common, by far, are corrosion damage and impact damage. Beyond this, each car that you work on is likely to exhibit some daring innovations in the field of possible sheet metal defects. Stress cracking occurs routinely in some areas of some cars. Wood-framed bodies often exhibit structural shifting that deforms sheet metal, while swelled framing wood can bulge sheet metal in ways that are difficult to resolve. In cars with welded and spot welded attachments, a combination of vibration and corrosion can cause things to break loose and move in ways that produce major messes.
Yet with all of these possibilities, the damage that I most dread is that done by people armed with minimum knowledge, bad attitudes, heavy hammers and the misconception that they are in the body repair business. When these types and their minions add acetylene torches, plasma arc cutters and pop rivet guns to their basic repertoire of chipped hammers and hardened-screw-tipped slide hammers, they become a definite menace to the welfare of sheet metal everywhere.
It is sometimes difficult to fathom the degree of imbecility and the resulting destruction that some of these Bondo artists have done to the panels of the poor automobiles that have had the misfortune to come under their hammers. Instead of carefully analyzing the nature of the panel damage that confronts them and repairing it in non-destructive ways, these minor thinkers apply the heaviest hammers or biggest pry bars that they can wield against damaged areas of metal, literally bashing things back toward their right places. In that barbaric process, they produce stretching, further deformation and work hardening that are difficult to correct later.
When confronted with rust or torn metal, sectioning and butt-welding are usually beyond their limited skill levels, so out come the flanging tools, brazing rods, and pop rivet tools. More damage inevitably follows.
These guys buy plastic filler by the 55-gallon drum and the only apparent limit to their use of this stuff seems to be that they never allow the weight of the filler to exceed the weight of the original automobile. Aside from the fact that this kind of work has a life expectancy of between 6 months to 2 years, it always produces severe problems when it has to be reworked by someone who wants to do it right. OK, you've been warned. Also, as always, avoid seeing things in stereotypes.
The two most common forms of sheet metal damage, corrosion and impact, should be dealt with in very specific ways. Corrosion damage must be detected by investigation that employs physically picking and probing, in addition to visual inspection. This may seem brutal, but all kinds of corrosion can be lurking under seemingly sound paint. Certainly, where paint has bubbled and/or blistered, there is good cause to suspect underlying corrosion. A scratch awl is your best guide to its extent. Where body contours appear to be modified, or where panels are 1/8 inch thick, or more, you will often find rust, fiberglass bandages, pop riveted roofing tin and any manner of other mischief underneath the surface.
Flanged and brazed panel patches are also frequently found under bubbling paint. Sometimes, and this is almost a pleasant surprise, filler will be used to cover dents and other impact damage because the attempted repair involved difficult access to the back of a panel or the individual making the repair lacked the skill and/or commitment to bump the panel to correct its contours. Alas, more often than not in these cases, a slide hammer and hardened screw, body hooks, or welded studs were used to pull dents out crudely, and what lurks under the Bondo is serious corrosion damage, made worse by this kind of attempted repair.
The drift of all of this is that the only proper way to repair corrosion damage that perforates sheet metal is to weld in new metal, and the only proper way to deal with impact deformation is to beat it back out in ways that produce the least stretching and buckling of the metal.
Sometimes, small amounts of filler are necessary. When this is the case, body lead (actually an alloy of tin and lead that is now commonly available in a 30/70 ratio) is really the only way to go in restoration work.
In addition to the work hardening that occurs in body panels when they are stamped and later subjected to road vibration and flexing forces, there are several other changes in autobody sheet metal that occur when there is impact damage and the attempt to repair it. The most important of these is stretching. When a panel is severely deformed in an accident, it is sometimes stretched. This means that the pressure exerted on it has caused it to become longer or wider, or both. When this happens, it also has become thinner somewhere. Unfortunately, the act of straightening a deformed and stretched panel involves hammering on its ridges and channels, either directly over a dolly block or adjacent to one. This often results in further stretching the metal because metal is made thinner when it is hammered on. Bad repairs often work harden and stretch metal. This can create a difficult combination of defects to address with proper repairs.
The opposite of stretching is "upsetting," which sometimes occurs in impact damage but more often is the result of bad repair strategy. This phenomenon involves making an area or areas of the metal in a panel thicker and laterally smaller than it or they were originally. Hammering down a bad buckle directly over a dolly block can produce an upset because the metal may have no lateral place to go. The result is that the upset part of the panel becomes thicker and laterally smaller than it was. This defect must be corrected for the metal to assume its correct original contours. Upsetting can be dealt with in a repair situation and is, in fact, sometimes purposely induced to overcome the effects of stretching. In that case, it is called "shrinking."
Impact Repair Approaches
Impact and corrosion damage are sometimes so severe that it is necessary to find replacement panels or to fabricate and section new metal into damaged areas. An example of a small panel fabrication and of section welding are shown and described in the photos and captions that accompany the text of the next chapter. Much of the bodywork that a restorer is likely to encounter involves minor crash damage—dents, scores and the like. It is the complete removal of such damage that can distinguish a very well restored car from one that looks like a near miss.
The most important aspect of repairing this kind of damage is to understand the material with which you are working—sheet metal—and to have some general and specific notions of how it got deformed and what kinds of actions will be necessary to return it to its original shape with a minimum of distortion, stretching and upsetting. Remember, a dolly block and hammer used the wrong way can be as destructive as the events that caused the damage that you are trying to repair.
Proceed in these matters with a very definite plan of attack. Part of that plan should be based on the known sheet metal theory that is described in this book and in the books mentioned at the beginning of this chapter. Another part of your plan will come from your experience, gained from experimentation with scrap panels. The point is, when you swing a body hammer, or decide where to begin to remove a dent, or whether to work "on dolly" or "off dolly," your knowledge will guide you and your experience will give you an intuitive sense of what the results of a given action will be.
Prior to the publication of Fairmont Forge's The Key to Metal Bumping in 1939, such texts that existed in the field of body repair tended to be vague and to stress the black magic aspects of the craft. Sheet metal skills tended to be passed on by oral tradition, which meant that there were some awfully good practitioners and some who were pretty bad. The Key… was a major contribution to the craft because it proposed a simple and very understandable format for sheet metal defect analysis and repair.
The nugget of the "Fairmont Method" was to logically distinguish between "direct" and "indirect" damage. Direct damage includes areas that have come into direct contact with an impacting object or objects. Indirect damage describes areas that are deformed and locked in by the results of the direct damage, but which were not actually directly impacted.
Most indirectly damaged areas will spring pretty much back into proper shape if the adjacent areas of direct damage are removed and the forces holding the indirectly damaged areas are thus released. Stamped steel has a memory that promotes this return to original format. Typically, briefcase-sized dents involve mostly indirect damage in terms of the amount of effected surface area. The Fairmont Method prescribes unlocking large expanses in sheet metal that are not deformed beyond their elastic limits by working only on those areas that are. A small "key" unlocks a big puzzle. The revelation of the Fairmont Method is that you don't have to get a big hammer and pound mindlessly on everything that seems to be pushed in or out in a process that inevitably stretches and work hardens metal unnecessarily and counter-productively.
Instead, inspection and analysis will indicate which areas involve direct damage and therefore should be dealt with first. In addition to inspection, the application of logic will yield an understanding of the sequence in which direct and indirect damage occurred. If direct damage is repaired in the reverse order that it occurred, most of the indirect damage will be released as you go along.
More recent approaches to body damage analysis and repair strategy tend to pay more attention to what is there and less to exactly how it got there. I tend to side with the latter approach but hasten to add that, if you can determine the order of deformation of a particular damaged area, removing the constituents of the damage in the reverse order of their creation is always a good approach. It is not, however, a good idea to waste half a day theorizing about the order of creation of damage, since this is not absolutely necessary information to have in-head before you proceed with corrective measures.
In any theory of damage analysis and repair strategy, the damage itself is reduced to one or a combination of three possible constituent parts. These are V-channels, ridges and buckles (also called "rolled buckles"). These three categories, and their almost infinite combinations, cover the field. Ridges, as the name implies, are areas of raised metal, which stand out in a linear formation. V-channels are depressed areas formed into lines, the opposite of ridges. Buckles are areas that are forced and locked into the metal by the waveform created in the metal by the original impact.
Unlike ridges and V-channels, which are either results of direct damage or fairly gentle extensions from it, buckles are formed by the collapse of the metal when it is under pressure and literally has no alternative other than to collapse. Buckles often involve substantial upsetting, which is not the case with ridges and V-channels.
When you recognize and understand the genesis of these three components of damage, you will be in a position to execute an effective strategy for their removal. In large part, your actions should unlock what are usually large areas of indirect damage.
In a sense, the test of a good strategy is how little hammer and dolly work is necessary to remove damage. The analysis method works because breaking damage into components, and attacking those components logically, represents an efficient attack on the causes of the problem. The alternative, to mindlessly attack the symptoms of damage, ends up as the "bigger hammer" approach and usually fails to recognize even such obvious components of damage as bent substructure. It substitutes damaging counter-force for intellect and skill. For that reason, it usually fails.
CLICK HERE FOR MORE RESTORATION ARTICLES
Source: https://www.oldcarsweekly.com/news/sheet-metal-basics
0 Response to "Is 28 Gauge Sheet Metal Easy to Bend for Body Work"
Post a Comment